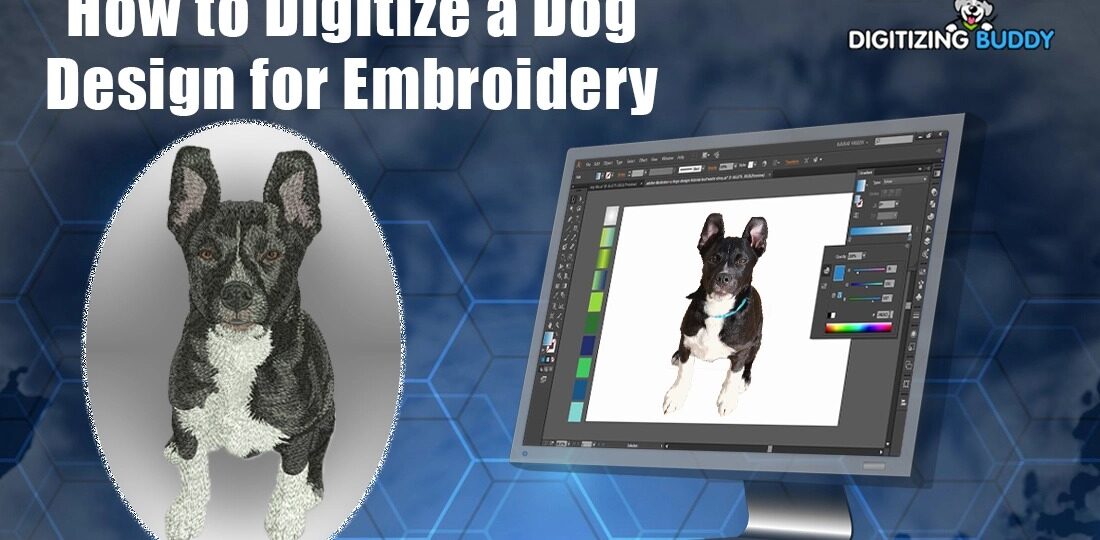
How to Digitize a Dog Design for Custom Embroidery Projects
November 6, 2025 | by IoT Development Company
Introduction
You’ve got the perfect photo of your pup—those soulful eyes, that goofy grin, maybe even a tilted head that screams “treat?” Now imagine stitching that adorable face onto a tote, a hoodie, or a pillow. It’s not just a dream; it’s totally doable with embroidery digitizing. Turning a dog design into a stitch-ready file lets you create custom gifts, pet-themed merch, or heartfelt keepsakes that last. Whether you’re a beginner with a home machine or a pro crafting for clients, the process is fun and rewarding. Let’s walk through how to digitize a dog design step by step and bring your furry friend to life in thread.
Step 1: Pick the Perfect Dog Image
Start with a clear, high-quality photo. A well-lit, high-resolution shot (at least 300 DPI) with good contrast makes digitizing way easier. Avoid blurry phone pics or busy backgrounds—your software (and your sanity) will thank you. If your dog’s photo has clutter, use a free tool like remove.bg to isolate the pup.
Choose a pose that translates well to stitches. Front-facing or three-quarter views work best; side profiles can flatten details. Focus on bold features—eyes, nose, ears, and fur texture. Subtle shading is tricky in embroidery, so pick images with defined shapes. A vector version (SVG or AI) is ideal, but a clean JPG or PNG works too.
Step 2: Choose Your Digitizing Software
You’ll need software to turn your image into stitches. Here are beginner-friendly options:
- Embrilliance Essentials – Affordable, intuitive, and great for custom designs.
- Ink/Stitch – Free plugin for Inkscape, perfect for budget crafters.
- Hatch by Wilcom – Pro-level with powerful auto-digitizing.
- Brother PE-Design – Tailored for Brother machines with easy PES export.
Most offer auto-digitizing, but manual control gives you better results. Start with the free trial of any tool to test the waters.
Step 3: Simplify the Design
Embroidery isn’t photography—it’s art with limits. Simplify your dog image before digitizing:
- Reduce colors to 5-8 max. Too many gradients create messy stitches.
- Outline key features — eyes, nose, mouth, and ear edges.
- Exaggerate contrast — boost blacks and whites so details pop.
- Remove tiny details — whiskers or flyaway fur get lost in thread.
Use your software’s “posterize” or “threshold” filter to create bold, stitchable shapes. Think cartoon style, not realism.
Step 4: Auto or Manual Digitizing
Auto-Digitizing (Fast but Limited)
Open your simplified image and use the auto-digitize tool. Select “PhotoStitch” or “Appliqué” mode. The software traces colors and assigns fill or satin stitches. Preview the result—check for gaps, dense clumps, or weird stitch angles. Tweak density (lower for softer fabrics) and underlay (add for stability).
Manual Digitizing (Pro Results)
For full control, trace manually:
- Outline with running stitches — use for fine lines like whiskers or ear edges.
- Fill large areas — fur, body, and background with tatami or satin fill.
- Add satin stitches for eyes, nose, and mouth—smooth and shiny.
- Layer underlay — zigzag or lattice to prevent puckering.
- Sequence wisely — stitch center out to avoid shifting.
Manual takes longer but lets you perfect fur texture, eye sparkle, and that signature doggy smile.
Step 5: Add Fur Texture and Personality
Make your dog design pop with smart stitch choices:
- Directional fills — angle fur stitches to follow the coat’s flow (short for smooth breeds, longer for fluffy ones).
- Color blending — use 2-3 thread shades in one area for depth (e.g., brown to tan for a golden retriever).
- Satin stitch eyes — add a white highlight stitch for that “alive” look.
- Puff embroidery — raise the nose or ears for 3D effect (great for pugs or corgis).
Preview in 3D mode if your software allows. Adjust pull compensation for stretchy fabrics like T-shirts.
Step 6: Export and Test Stitch
Save your file in your machine’s format—PES for Brother/Babylock, DST for others. Include multiple sizes (small for sleeves, large for backs) in one file if needed.
Test on scrap fabric first! Match your final material—cotton, fleece, or denim. Use:
- Cut-away stabilizer for knits.
- Tear-away for wovens.
- Water-soluble topper for fluffy fabrics like towels.
Check for:
- Puckering → add underlay or reduce density.
- Thread breaks → loosen tension or use better thread.
- Color accuracy → swap threads if needed.
Tweak and retest until the dog looks perfect.
Creative Project Ideas
Once digitized, your dog design shines in:
- Pet bandanas — add name below the face.
- Throw pillows — pair with paw prints.
- Hoodies or tees — left chest or full back.
- Tote bags — gift for dog walkers.
- Memorial quilts — stitch passed pets with dates.
Sell custom pet portraits on Etsy—clients send photos, you digitize and stitch. Add breed-specific icons (bones, balls, collars) for extra charm.
Common Mistakes to Avoid
- Too many colors → causes thread changes and bulk.
- Tiny details → blur or vanish in stitches.
- No underlay → leads to distortion on stretchy fabric.
- Wrong file format → machine won’t read it.
- Skipping the test → ruins your final piece.
Fix these early, and your dog will look sharp every time.
Pro Tips for Stunning Results
- Use polyester thread — shinier and stronger than cotton.
- Sharp 75/11 needles — prevent fabric damage.
- Hoop tightly — avoid shifting mid-stitch.
- Back up files — cloud or USB, just in case.
- Join communities — Reddit’s r/Machine_Embroidery or Facebook groups for feedback.
Many digitizers share free dog templates to practice with.
The Future of Dog Digitizing
AI is changing the game. Tools now auto-trace pet photos and suggest fur textures in seconds. Cloud digitizing lets you upload a pic from your phone and get a PES file in hours. Some apps even preview how the design looks on a hoodie before stitching.
Eco-threads and water-based stabilizers pair perfectly with clean digitizing to reduce waste. As home machines get smarter, digitizing your dog (or any pet) will only get easier and faster.
Conclusion
Learning how to digitize a dog design opens a world of custom embroidery fun. With a good photo, the right software, and a little practice, you can stitch your pup’s personality into every project. From gifts to side hustles, these designs bring joy in thread form.
So grab that photo, fire up your software, and start digitizing. Test, tweak, and stitch until your dog’s stitched twin steals the show. Your next project might just become a family heirloom—or the cutest tote on the block. Happy stitching!
RELATED POSTS
View all
Elevate Your Brand With Custom CBD Gummies Boxes
October 29, 2025 | by IoT Development Company

سؤال 2: چگونه میتوان بهترین سایت پیش بینی فارسی را برای شرطبندی ورزشی انتخاب کرد و چه ویژگیهایی نشاندهنده یک پلتفرم حرفهای هستند؟
December 1, 2025 | by IoT Development Company
How Tissue Regeneration Therapy Promotes Natural Healing
November 17, 2025 | by IoT Development Company